Keeping Your WordPress Site Safe and Secure
WordPress Security: A Shared Responsibility
While the WordPress core software is regularly audited by security experts and developers, additional measures are necessary to fully protect your site.
At WPsteer, we believe security isn’t just about eliminating risks—it’s about minimizing vulnerabilities. Regardless of technical expertise, every site owner can take steps to enhance their site’s security.
To simplify the process, we’ve compiled a comprehensive WordPress security checklist with actionable steps to safeguard your website.
For easy navigation, refer to our table of contents for a step-by-step guide to strengthening your site’s security.
WordPress Security Guide: Table of Contents
Fundamentals of WordPress Security
Simple WordPress Security Steps (No Coding Required)
Advanced WordPress Security for DIY Users
- Changing the Default Admin Username
- Disabling File Editing in WordPress
- Preventing PHP Execution in Specific Directories
- Limiting Login Attempts to Prevent Brute Force Attacks
- Enabling Two-Factor Authentication (2FA)
- Modifying the WordPress Database Prefix
- Adding Password Protection to Admin and Login Pages
- Disabling Directory Indexing and Browsing
- Turning Off XML-RPC for Security
- Automatically Logging Out Inactive Users
- Adding Security Questions to the Login Page
- Scanning for Malware and Security Vulnerabilities
- Recovering a Hacked WordPress Site
The Importance of WordPress Security
Why Website Security Matters
A compromised WordPress website can have devastating effects on your business, from financial losses to a damaged reputation. Hackers can steal sensitive data, such as user credentials and payment information, inject malicious code, and even spread malware to your visitors.
In the worst-case scenario, cybercriminals may lock you out of your own website and demand a ransom to restore access.
Every day, Google warns between 12 to 14 million users about potentially harmful websites and blacklists over 10,000 sites for malware and phishing. If your website is flagged, it can significantly impact your traffic, credibility, and search rankings.
Just as physical business owners take measures to protect their storefronts, website owners must proactively secure their WordPress sites to prevent attacks and ensure a safe experience for their visitors.
Keep WordPress Updated
WordPress is an open-source platform that receives regular maintenance and security updates. By default, minor updates are installed automatically, ensuring ongoing improvements and bug fixes.
However, major WordPress releases require manual updates, so it’s important to check for new versions and apply them promptly.

In addition to the core software, WordPress offers thousands of plugins and themes developed by third-party creators. These developers frequently release updates to fix vulnerabilities, improve performance, and introduce new features.
Keeping your WordPress core, plugins, and themes up to date is essential for maintaining the security and stability of your website. Regular updates help protect your site from potential threats and ensure it runs smoothly.
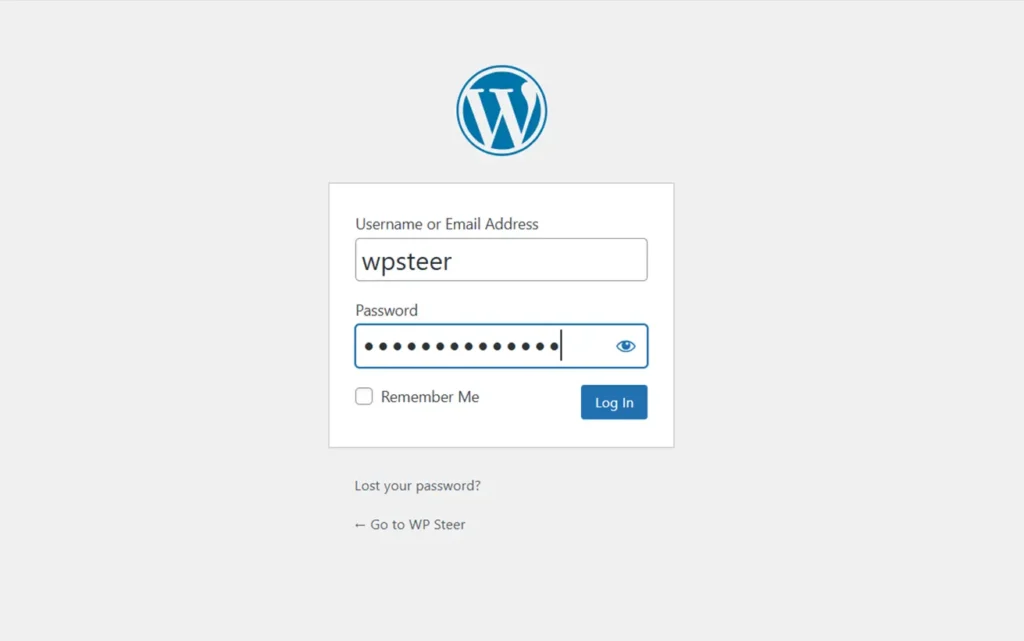
Use Strong Passwords and Manage User Permissions
One of the most common ways hackers gain access to WordPress sites is through stolen passwords. You can significantly reduce this risk by using strong, unique passwords for all aspects of your website.
This includes not only your WordPress admin account but also your FTP accounts, database, hosting account, and any custom email addresses associated with your domain.
Many users avoid strong passwords because they can be difficult to remember. However, using a password manager eliminates this problem by securely storing and autofilling passwords when needed.
For more details, check out our guide on managing WordPress passwords.
Additionally, limit access to your WordPress admin panel. Only grant administrator privileges to those who absolutely need it.
If you have multiple users, such as team members or guest authors, familiarize yourself with WordPress user roles and permissions to assign appropriate access levels and prevent unnecessary security risks.
The Role of WordPress Hosting in Security
Your WordPress hosting provider plays a crucial role in keeping your website secure. A reliable hosting service, such as Hostinger, Hosting.com, Bluehost, or SiteGround, implements multiple security measures to protect against common threats.
Here’s how quality hosting companies safeguard your website:
- Continuous Monitoring – They actively scan their network for suspicious activity.
- DDoS Protection – Built-in tools help mitigate large-scale distributed denial-of-service (DDoS) attacks.
- Regular Updates – Server software, PHP versions, and hardware are routinely updated to prevent security vulnerabilities.
- Disaster Recovery Plans – In case of a major failure, they have backup and recovery strategies to protect your data.
Simple WordPress Security Steps (No Coding Required)
Enhancing your WordPress security might seem overwhelming, especially if you’re not tech-savvy—but don’t worry, you’re not alone!
We’ve helped thousands of WordPress users strengthen their website security, and the good news is you don’t need any coding skills to do it.
With just a few clicks, you can significantly improve your site’s protection. If you can point and click, you can secure your site!
Set Up a WordPress Backup Solution
Backups are your first line of defense against security threats. No website is completely immune—if government sites can be hacked, so can yours.
Having a backup allows you to quickly restore your site in case of an attack or unexpected issue.
There are plenty of free and premium WordPress backup plugins available, but the most important rule is to store backups in a remote location, not just on your hosting account. We recommend using cloud storage services like Amazon S3, Dropbox, or private clouds like Stash.
Depending on how often you update your site, you should schedule daily or real-time backups for maximum protection.
The good news? This process is simple with plugins like Duplicator, Everest Backup, UpdraftPlus, or BlogVault—all easy to use, no coding required!
For step-by-step instructions, check out our guide on how to back up your WordPress website.
Install a Trusted WordPress Security Plugin
Once backups are set up, the next step is to install a security plugin that monitors and protects your website.
A good security plugin helps with:
- File integrity monitoring – Detects unauthorized changes to core files.
- Failed login attempt tracking – Prevents brute-force attacks.
- Malware scanning – Identifies and removes malicious code.
One of the best security plugins for WordPress is Sucuri Security. To get started, simply:
- Install and activate the free Sucuri Security plugin. (Need help? Follow our step-by-step guide on installing a WordPress plugin.)
- Go to Sucuri Security → Dashboard to review any security issues found on your site.
With this setup, you’ll have a powerful security monitoring system in place—no coding required!

Next, go to Sucuri Security → Settings and click on the Hardening tab.
For most websites, the default settings provide strong protection. Simply click the ‘Apply Hardening’ button for each option to activate them and enhance your site’s security.
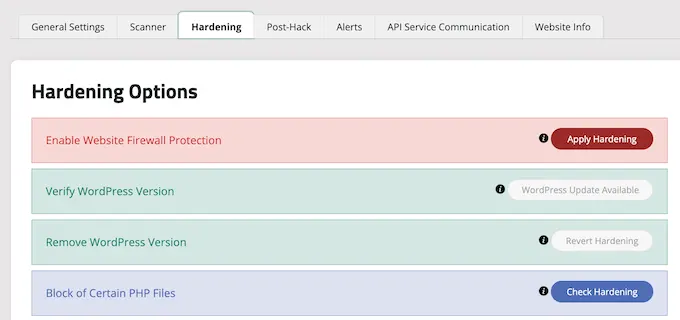
This strengthens key areas that hackers commonly target in their attacks.
Pro Tip: Later in this guide, we’ll explore additional ways to secure your website, such as changing the database prefix and admin username. These steps are more advanced and may require some coding knowledge.
Beyond the hardening settings, the plugin’s default configurations work well for most websites and typically don’t need adjustments.
The only setting we recommend customizing is email alerts, which you can find under the ‘Alerts’ tab in the settings menu.
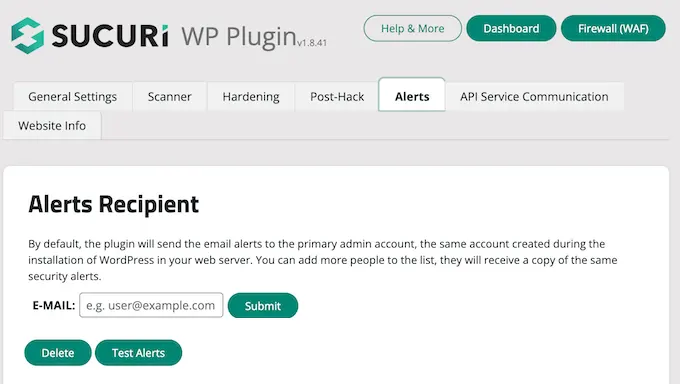
By default, you may receive numerous email alerts, which can quickly overwhelm your inbox.
To keep things manageable, we recommend enabling notifications only for essential actions, such as plugin changes and new user registrations.

This WordPress security plugin offers robust protection, so take some time to explore its various tabs and settings. It includes features like malware scanning, audit logs, failed login attempt tracking, and more.
For a deeper dive into its capabilities, check out our detailed Sucuri review.
Enable a Web Application Firewall (WAF)
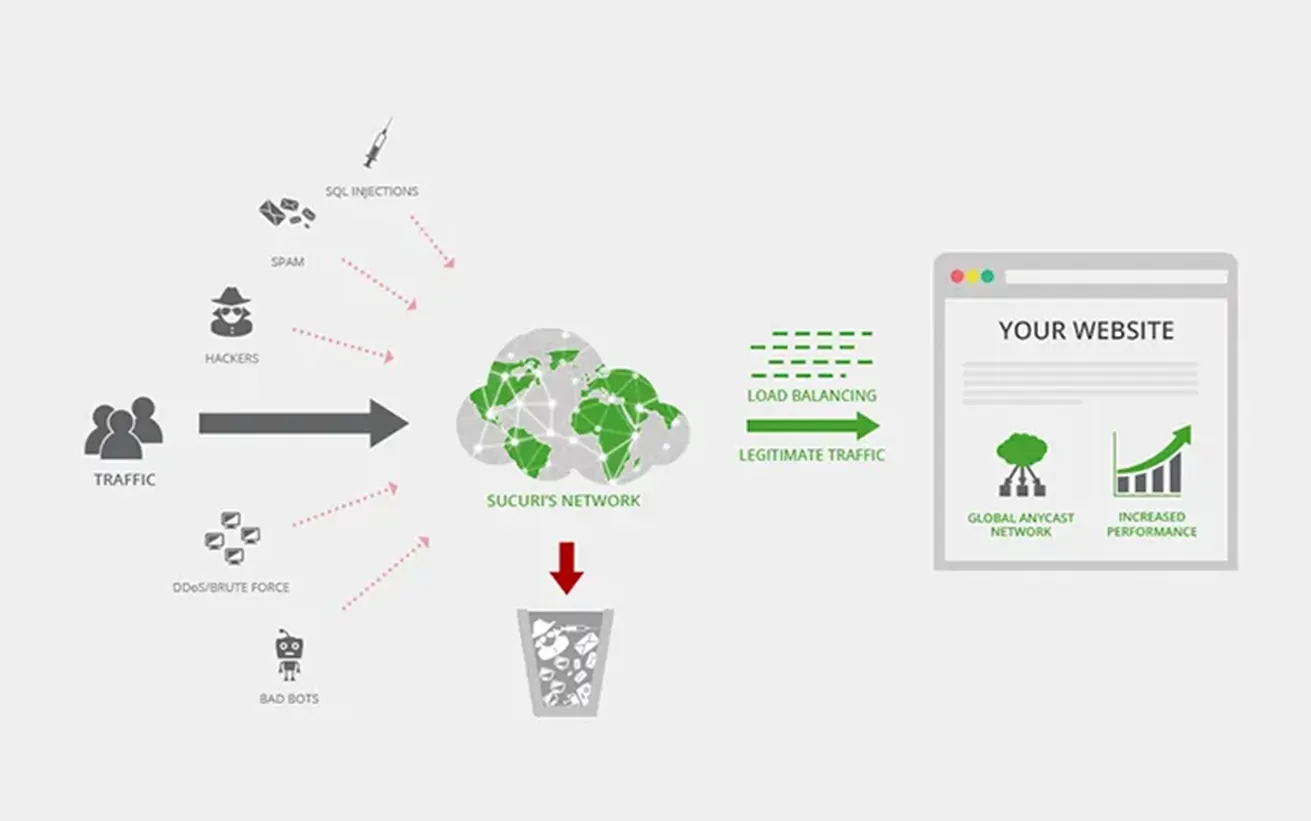
A Web Application Firewall (WAF) is one of the most effective ways to safeguard your WordPress site and prevent malicious attacks.
A WAF acts as a barrier between your website and potential threats by filtering out harmful traffic before it can cause damage.
- DNS-Level Firewall: Routes your website traffic through cloud proxy servers, ensuring only legitimate visitors reach your web server.
- Application-Level Firewall: Filters traffic once it reaches your server, blocking threats before most WordPress scripts load. However, it is less efficient at reducing server load compared to a DNS-level firewall.
We relied on Sucuri for years at WPsteer and continue to recommend it as one of the top web application firewalls for WordPress. Recently, we transitioned from Sucuri to Cloudflare to take advantage of a larger CDN network with enterprise-focused features.
For more insight, check out how Sucuri helped us block 450,000 WordPress attacks in a single month.
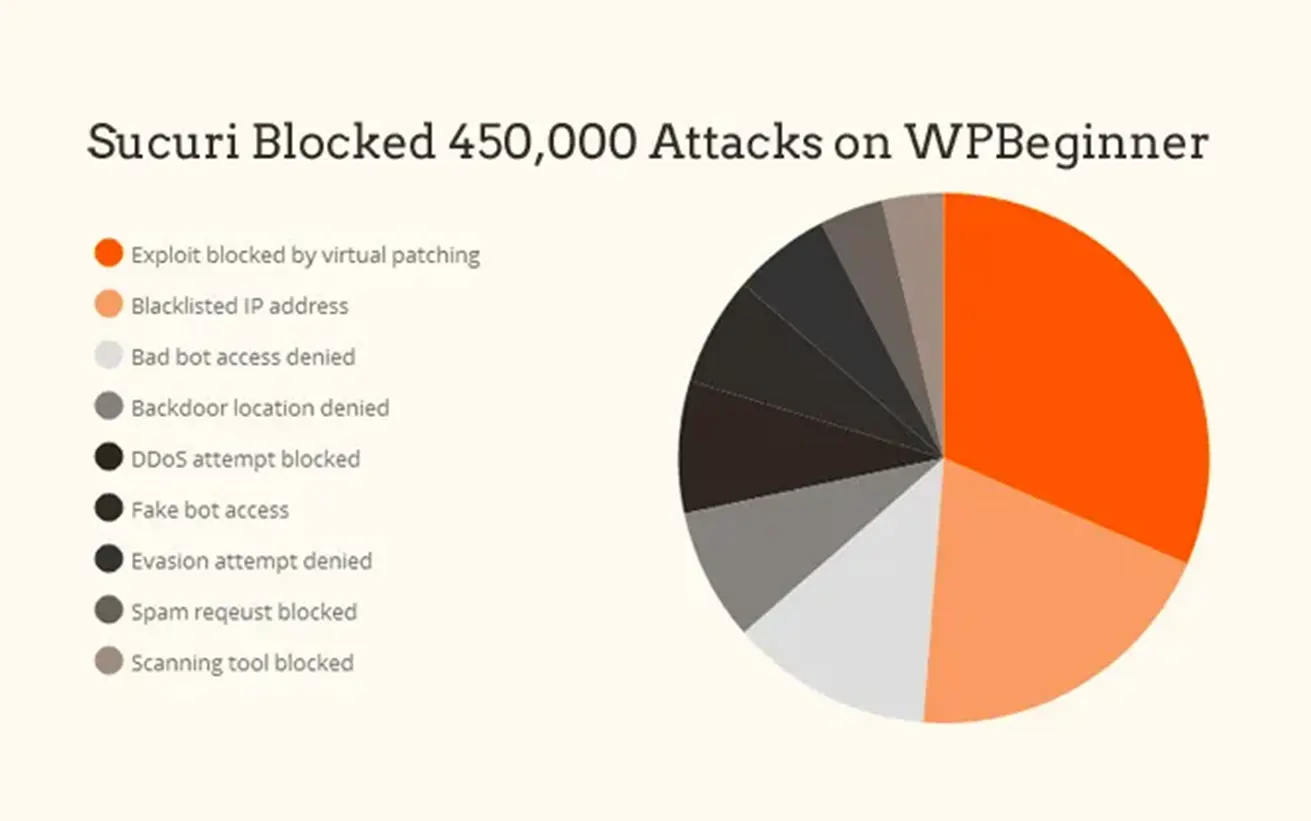
One of the biggest advantages of Sucuri’s firewall is its malware cleanup and blacklist removal guarantee. If your website gets hacked while under their protection, they promise to fix it—no matter how many pages you have.
This is a significant benefit since recovering a hacked website can be costly. Security experts typically charge over $250 per hour, but with Sucuri, you get comprehensive protection and cleanup for just $199 per year.
However, Sucuri isn’t the only DNS-level firewall provider available. Another popular option is Wordfence. Check out our detailed comparison of Sucuri vs. Wordfence, including their pros and cons, to see which one is the best fit for your needs.
Migrate Your WordPress Site to SSL/HTTPS
SSL (Secure Sockets Layer) is a security protocol that encrypts the data exchanged between your website and visitors’ browsers. This encryption helps protect sensitive information from being intercepted or stolen.
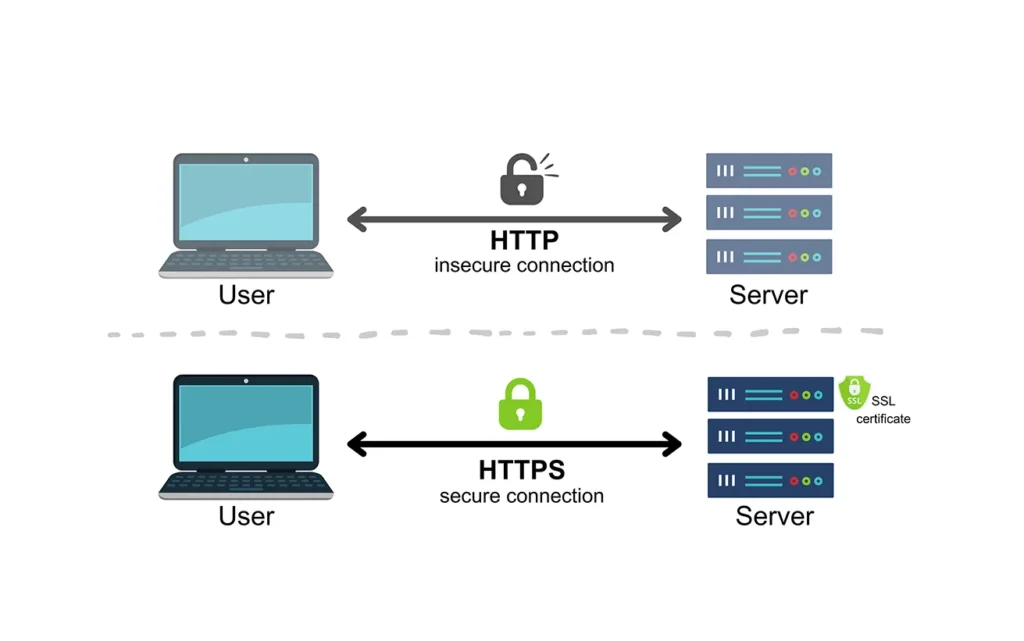
Once SSL is activated, your website URL will switch from HTTP to HTTPS, and a padlock icon will appear next to your address in the browser, signaling a secure connection.
SSL certificates are issued by certificate authorities and typically range from $80 to several hundred dollars per year. Due to the cost, many website owners previously continued using the less secure HTTP protocol.
To address this, the non-profit organization Let’s Encrypt offers free SSL certificates, supported by major companies like Google Chrome, Facebook, and Mozilla.
Today, enabling SSL is easier than ever. Many web hosting providers now include a free SSL certificate with their hosting plans.
If your hosting provider doesn’t offer one, you can purchase an SSL certificate from Domain.com, which provides some of the most reliable SSL options on the market. Their certificates include a $10,000 security warranty and a TrustLogo security seal for added credibility.
Advanced WordPress Security for DIY Users
If you’ve implemented the security measures we’ve covered so far, your site is already well-protected.
However, there are additional steps you can take to further strengthen your WordPress security.
Some of these methods may require technical knowledge, so proceed carefully if you’re not familiar with coding.
Change the Default Admin Username
In the past, WordPress automatically assigned the default administrator username as “admin.” Since usernames make up half of the login credentials, this made brute-force attacks easier for hackers.
Fortunately, WordPress now requires users to create a custom username during installation. However, some one-click WordPress installers still default to “admin.” If that’s the case with your setup, consider switching to a more secure web hosting provider.
Since WordPress doesn’t allow username changes by default, here are three ways to modify your admin username:
- Create a new administrator account and delete the old one.
- Use the Username Changer plugin.
- Manually update the username via phpMyAdmin.
For step-by-step instructions, check out our guide on how to properly change your WordPress username.
Note: This applies to the username “admin,” not the administrator user role, which is sometimes also referred to as “admin.”
Disable File Editing
WordPress includes a built-in code editor that allows you to modify theme and plugin files directly from the admin dashboard.
While this feature can be useful, it also poses a security risk if unauthorized users gain access to your site. To prevent potential threats, we recommend disabling file editing altogether.
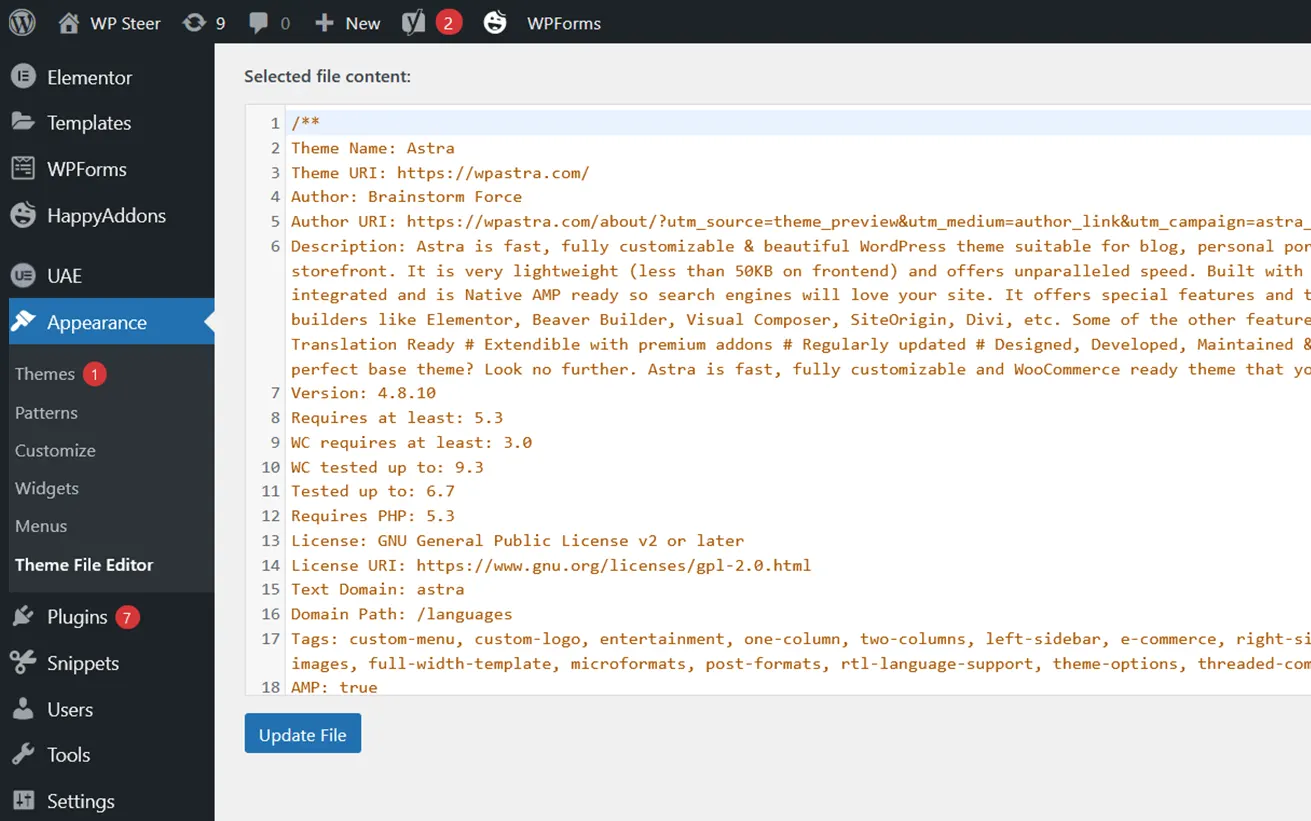
You can disable file editing by adding the following code to your wp-config.php file or by using a code snippet plugin like WPCode (recommended):
You can follow our step-by-step guide on disabling theme and plugin editors in the WordPress admin panel.
Alternatively, you can enable this with a single click using the Hardening feature in the free Sucuri plugin mentioned earlier.
Preventing PHP Execution in Specific Directories
Preventing PHP file execution in certain WordPress directories adds an extra layer of security. A common practice is to disable PHP execution in folders like /wp-content/uploads/, where it’s not necessary.
To do this, open a text editor like Notepad and insert the following code:
Save the file as .htaccess and upload it to the /wp-content/uploads/ folder on your website using an FTP client.
For step-by-step instructions, check out our guide on how to disable PHP execution in specific WordPress directories.
Alternatively, you can enable this protection with a single click using the Hardening feature in the free Sucuri plugin mentioned earlier.
Restrict Login Attempts
By default, WordPress allows unlimited login attempts, making it vulnerable to brute-force attacks. Hackers can repeatedly try different password combinations until they gain access.
To prevent this, you can limit the number of failed login attempts a user can make. If you have already set up a web application firewall (WAF) as mentioned earlier, this feature is likely built-in.
However, if you don’t have a firewall in place, follow these steps:
- Install and activate the Limit Login Attempts Reloaded plugin.
- Need help? Follow our step-by-step guide on how to install a WordPress plugin.
- Once activated, the plugin automatically restricts login attempts.
- The default settings work well for most websites, but you can customize them:
- Go to Settings » Limit Login Attempts
- Click the Settings tab
- Adjust login restrictions and enable GDPR compliance if needed
This simple security measure helps protect your website from unauthorized access.
For step-by-step guidance, check out our detailed guide on the importance of limiting login attempts in WordPress and how to set it up.
Enable Two-Factor Authentication (2FA)
Two-factor authentication (2FA) adds an extra layer of security to your WordPress login by requiring two steps:
- Enter your username and password.
- Verify your identity with a code from a trusted device or authentication app.
Many major platforms like Google, Facebook, and Twitter offer 2FA, and you can easily implement it on your WordPress site as well.
To get started, install and activate the WP 2FA – Two-Factor Authentication plugin. If you need help, follow our step-by-step guide on installing a WordPress plugin.
Once activated, a setup wizard will guide you through the process, and you’ll receive a QR code to scan for authentication.

Setting Up Two-Factor Authentication (2FA)
To enable 2FA, scan the provided QR code using an authentication app on your smartphone, such as Google Authenticator, Authy, or LastPass Authenticator.
We recommend Authy or LastPass Authenticator because they offer cloud backups, ensuring you can easily restore your accounts if you lose, reset, or replace your phone.
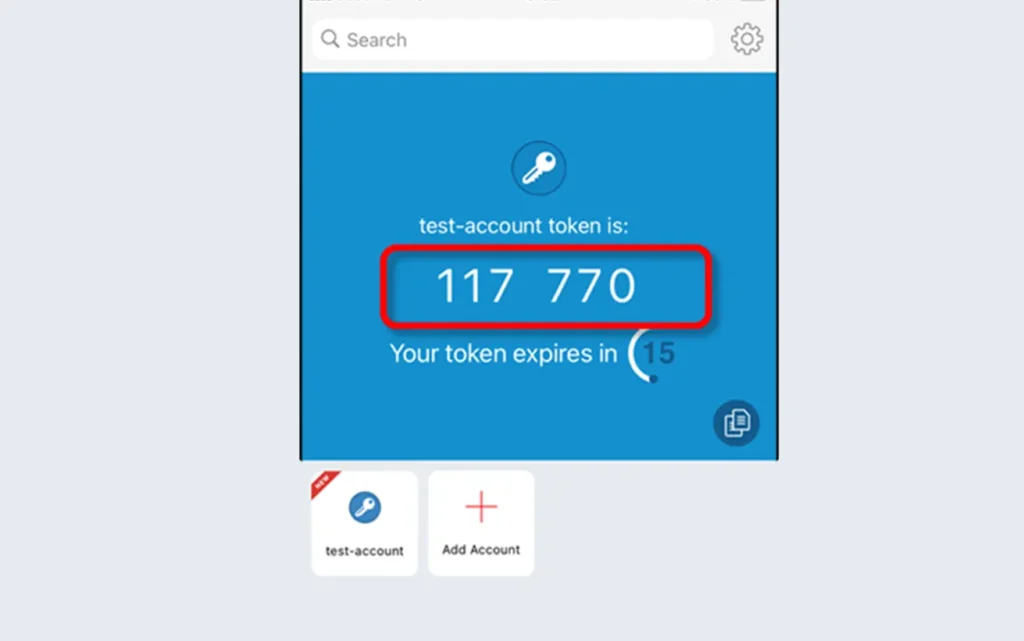
Most authentication apps function similarly. If you’re using Authy, simply tap the ‘+’ or ‘Add Account’ button to add your WordPress login.

Simply point your phone’s camera at the QR code on your computer screen to scan it. If prompted, grant the app permission to access your camera.
After scanning, name the account and save it.
The next time you log in to your website, you’ll need to enter the two-factor authentication code after your password for added security.
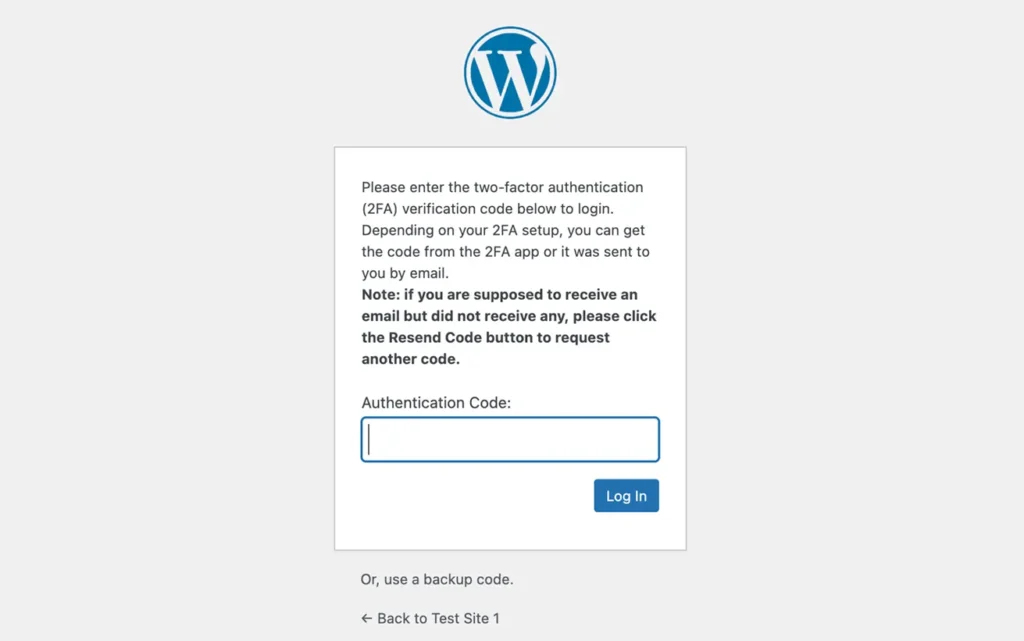
Open the authenticator app on your phone to retrieve a one-time code.
Enter this code on your website to complete the login process securely.
Modify the WordPress Database Prefix for Added Security
WordPress assigns “wp_” as the default prefix for all database tables.
Using the default prefix makes it easier for hackers to predict table names, increasing the risk of attacks. To enhance security, it’s recommended to change this prefix.
Follow our step-by-step guide on how to change the WordPress database prefix safely.
Note: Incorrectly modifying the database prefix can cause issues with your site. Only proceed if you’re confident in your technical skills.
Secure Your WordPress Admin and Login Page with Password Protection
By default, hackers can access your wp-admin folder and login page without restrictions, making them vulnerable to brute-force attacks and DDoS attempts.
To enhance security, you can add an extra layer of password protection at the server level, preventing unauthorized access before they even reach WordPress.
Follow our step-by-step guide on how to password-protect your WordPress admin directory to keep your site safe.
Turn Off Directory Indexing and Browsing
When you access a website folder in a browser, it usually loads an index.html file if available. However, if that file is missing, the browser may display a list of all files in the directory. This is known as directory browsing and poses a security risk.
Hackers can use directory browsing to identify vulnerable files and exploit them to gain access to your site. It also allows others to copy images, explore your directory structure, and gather sensitive information.
To prevent this, it’s important to disable directory indexing and browsing:
Connect to your website using FTP or your hosting provider’s file manager.
Locate the .htaccess file in your site’s root directory. (If you don’t see it, check our guide on how to find the .htaccess file in WordPress.)
Add the following line to the end of the .htaccess file:
Options –Indexes
4. Save the changes and upload the updated .htaccess file back to your server.
For a more detailed walkthrough, check out our guide on how to disable directory browsing in WordPress.
Disable XML-RPC in WordPress
XML-RPC is a built-in WordPress API that allows your site to connect with web and mobile apps. It has been enabled by default since WordPress 3.5.
However, XML-RPC can make your site vulnerable to brute-force attacks.
Here’s why:
- Normally, a hacker trying 500 different passwords would need to make 500 separate login attempts. A security plugin like Limit Login Attempts Reloaded would detect and block this.
- But with XML-RPC, hackers can use the system.multicall function to test thousands of passwords in just 20 or 50 requests, making attacks much more efficient.
If you’re not using XML-RPC, it’s best to disable it.
Ways to Disable XML-RPC in WordPress
We’ve outlined three different methods in our step-by-step guide on how to disable XML-RPC in WordPress.
Tip: The .htaccess method is the best because it’s the most resource-efficient. However, there are easier options for beginners.
If you’re using a Web Application Firewall (WAF), XML-RPC is automatically disabled, so you don’t have to worry about it.
Automatically Log Out Idle Users in WordPress
Sometimes, logged-in users step away from their screens, leaving their accounts vulnerable. If someone gains access, they could change passwords, edit settings, or take control of the account.
To prevent this, many banking and financial websites automatically log out inactive users. You can add the same feature to your WordPress site.
How to Enable Automatic Logout for Inactive Users
- Install and activate the Inactive Logout plugin.
- Go to Settings » Inactive Logout to customize the logout settings.
This ensures better security by automatically signing out users after a set period of inactivity.
Just set the inactivity time limit and customize the logout message. Then, click the ‘Save Changes’ button to apply your settings.
For a detailed walkthrough, check out our step-by-step guide on how to automatically log out idle users in WordPress.
Add Security Questions to Your WordPress Login Screen
Enhance your WordPress login security by adding a security question, making it more difficult for unauthorized users to gain access.
To do this, install and activate the Two Factor Authentication plugin. Then, navigate to Multi-factor Authentication » Two Factor in your WordPress dashboard to configure the settings.
This plugin allows you to set up various two-factor authentication methods, including security questions, for added protection.
Scan Your WordPress Site for Malware and Security Vulnerabilities
If you have a WordPress security plugin installed, it will automatically monitor your site for malware and potential threats.
However, if you notice a sudden drop in website traffic or search rankings, it’s a good idea to manually scan your site for malware. You can do this using your existing security plugin or a dedicated malware scanner.
Simply enter your website URL into a malware scanner, and it will analyze your site for malicious code and vulnerabilities.
Keep in mind that most security scanners can only detect malware—they don’t remove it. If your site is infected, you’ll need to take additional steps to clean it, which we’ll cover in the next section.
Restore and Secure a Hacked WordPress Site
Many WordPress users underestimate the importance of backups and security until their site is compromised.
Hackers often leave behind backdoors that allow them to regain access even after an initial cleanup. If these vulnerabilities aren’t properly addressed, your site could be hacked again.
For tech-savvy users, we have a step-by-step guide on how to fix a hacked WordPress site. However, cleaning up malware and securing your website can be complex and time-consuming.
If you prefer expert assistance, consider using a professional service:
- Sucuri Security – If you’re a paid Sucuri user, their plan includes hacked site cleanup.
Investing in professional security services can save you time and ensure your site is fully restored and protected.
FAQs on WordPress Security
Website security is a major concern for WordPress users, and we often receive questions about how to keep sites safe. Below are answers to some of the most frequently asked questions about WordPress security.
Is WordPress Safe to Use?
Yes, WordPress is built with security in mind, especially when kept up to date. However, due to its popularity, it’s a common target for hackers. The good news is that by following security best practices—like the ones in this guide—you can significantly reduce the risk of attacks.
What Can Put My WordPress Website at Risk?
Hackers use various methods to compromise websites, such as:
- Brute-force attacks (guessing passwords)
- Malware injections (installing harmful software)
- Exploiting vulnerabilities in outdated themes, plugins, or WordPress core
How Often Should I Update My WordPress Website?
Regular updates are essential for security, as they often include fixes for known vulnerabilities. We recommend enabling automatic updates or manually checking for updates at least once a week to keep your site protected.
Do I Need a Security Plugin?
While not mandatory, security plugins add an extra layer of protection. They can help detect malware, block malicious traffic, and enforce strong security measures automatically.
How Do I Know If My Website Has Been Hacked?
Signs of a hacked website include:
- Unfamiliar users or files appearing in your WordPress dashboard
- Unexpected redirects sending visitors to unknown websites
- Slow website performance or crashes
- Warnings from Google or your hosting provider about potential malware
What Should I Do If My Website Gets Hacked?
If you suspect a hack, act quickly:
- Contact your web hosting provider for assistance.
- Scan your site for malware using a security plugin.
- Restore a clean backup if you have one available.
- Change all passwords, including WordPress admin, database, and FTP.
- Consider professional help if the issue persists.
We hope this guide helps you secure your WordPress website. For more insights, check out our articles on why WordPress sites get hacked and the best WordPress security plugins.
If you found this information helpful, subscribe to our YouTube Channel for more WordPress tutorials. You can also connect with us on Twitter and Facebook.