WordPress is one of the most flexible and customizable content management systems (CMS) available. A key part of this flexibility comes from WordPress plugins, which allow you to enhance your website’s functionality with ease.
WordPress offers a built-in plugin directory featuring both free and premium plugins. These plugins can add features like:
- Contact forms
- Custom newsletters
- Website caching
- Security enhancements
Some plugins even transform your WordPress site into a fully functional online store (using WooCommerce) or an eLearning platform (with LMS plugins). If you have coding experience, you can even create your own custom plugin.
In this guide, we’ll walk you through three different ways to install WordPress plugins, along with essential tips for choosing the best plugins to enhance your website.
How to Install a WordPress Plugin
There are three primary ways to install a plugin in WordPress:
- Using the WordPress Plugin Search (within the dashboard)
- Uploading a Plugin (via the admin panel)
- Installing via FTP (manual file transfer)
In this guide, we’ll walk you through each method to help you understand the process.
1. Installing a Plugin via the WordPress Plugin Search
The WordPress plugin repository offers a vast selection of free plugins that have been reviewed for security and compatibility. This is the easiest way to install plugins, and they also receive automatic updates to keep them secure and up-to-date.
To install a plugin from the repository:
- Go to Plugins → Add New in your WordPress dashboard.
- Search for the plugin by name.
- Click Install Now, then Activate to enable its features on your website.
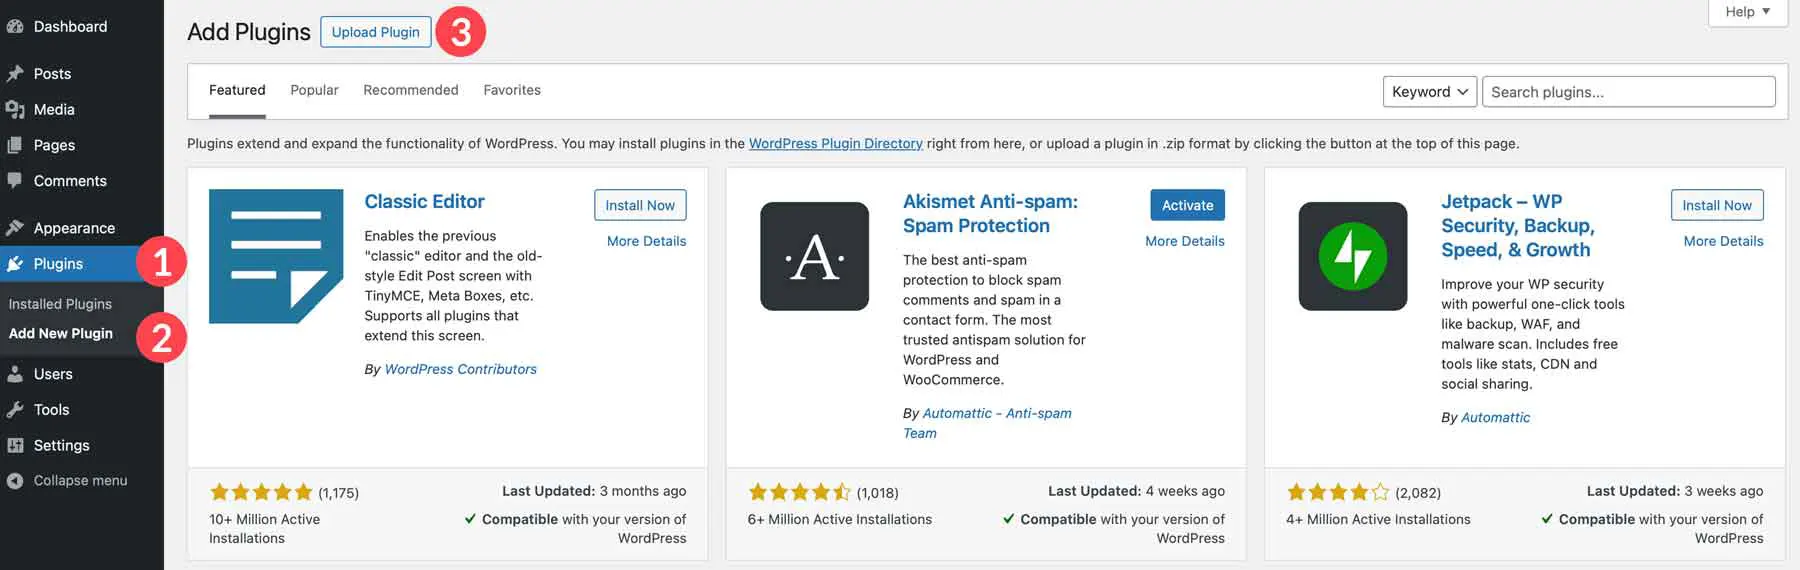
When the page reloads, you’ll see a search bar in the top right corner. You can search for plugins by keyword, author, or tag to find the right tool for your needs.
The WordPress plugin repository includes a variety of plugins for different purposes. For example:
- SEO plugins like Rank Math help optimize your site for search engines.
- Backup plugins such as UpdraftPlus let you save backups to cloud storage services like Amazon S3, Dropbox, and more.
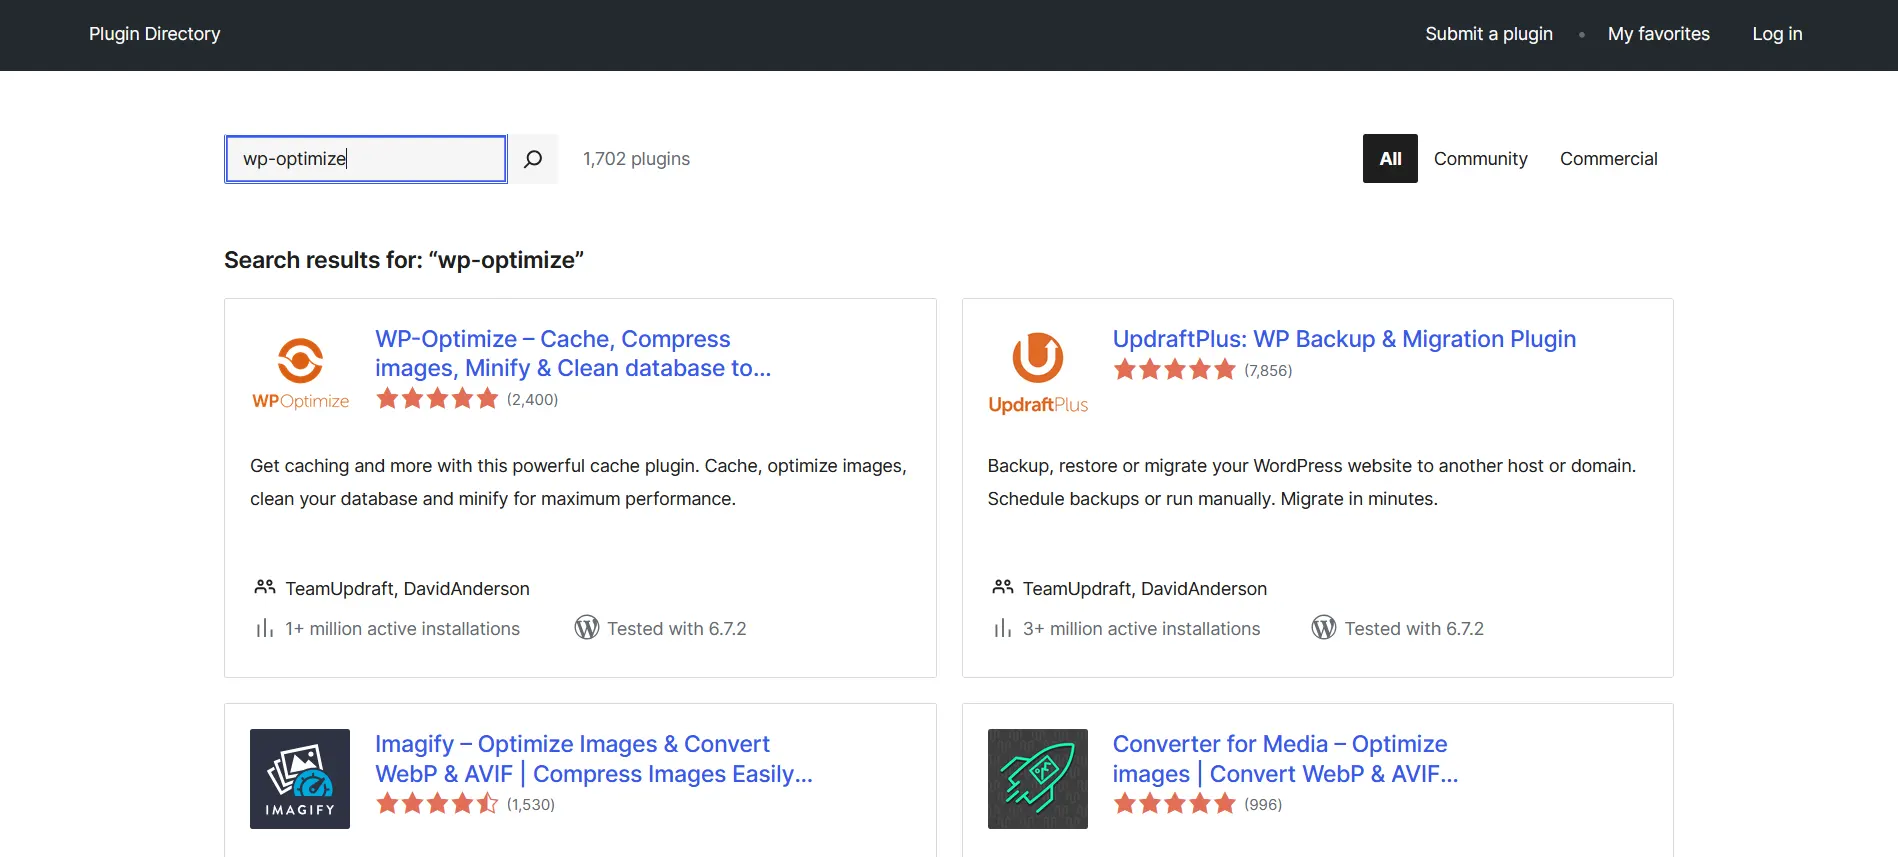
To find a plugin, enter a relevant keyword into the search bar. If you’re looking for a performance optimization plugin, select Tag from the dropdown menu, type “performance,” and press Enter. The search results will display the most popular and highly rated plugins first. For instance, LiteSpeed Cache often appears at the top due to its high number of installations and positive reviews.
Tips for Installing Plugins from the WordPress Repository
When selecting plugins from the WordPress repository, keep a few key factors in mind:
Identify Your Needs First
Before installing any plugin, determine what functionality you require. Are you looking for a contact form (like WPForms), an SEO tool (AIOSEO), or an image gallery? Knowing your exact needs will help you avoid unnecessary plugins that can slow down your website.Check Popularity and Active Installations
Plugins with a high number of active installations are often more reliable. A large user base means the plugin has been widely tested and is less likely to cause compatibility issues.Read Reviews and Ratings
Before installing, check the average rating and user reviews. Look for plugins with high ratings and positive feedback to ensure they are well-maintained and perform as expected.
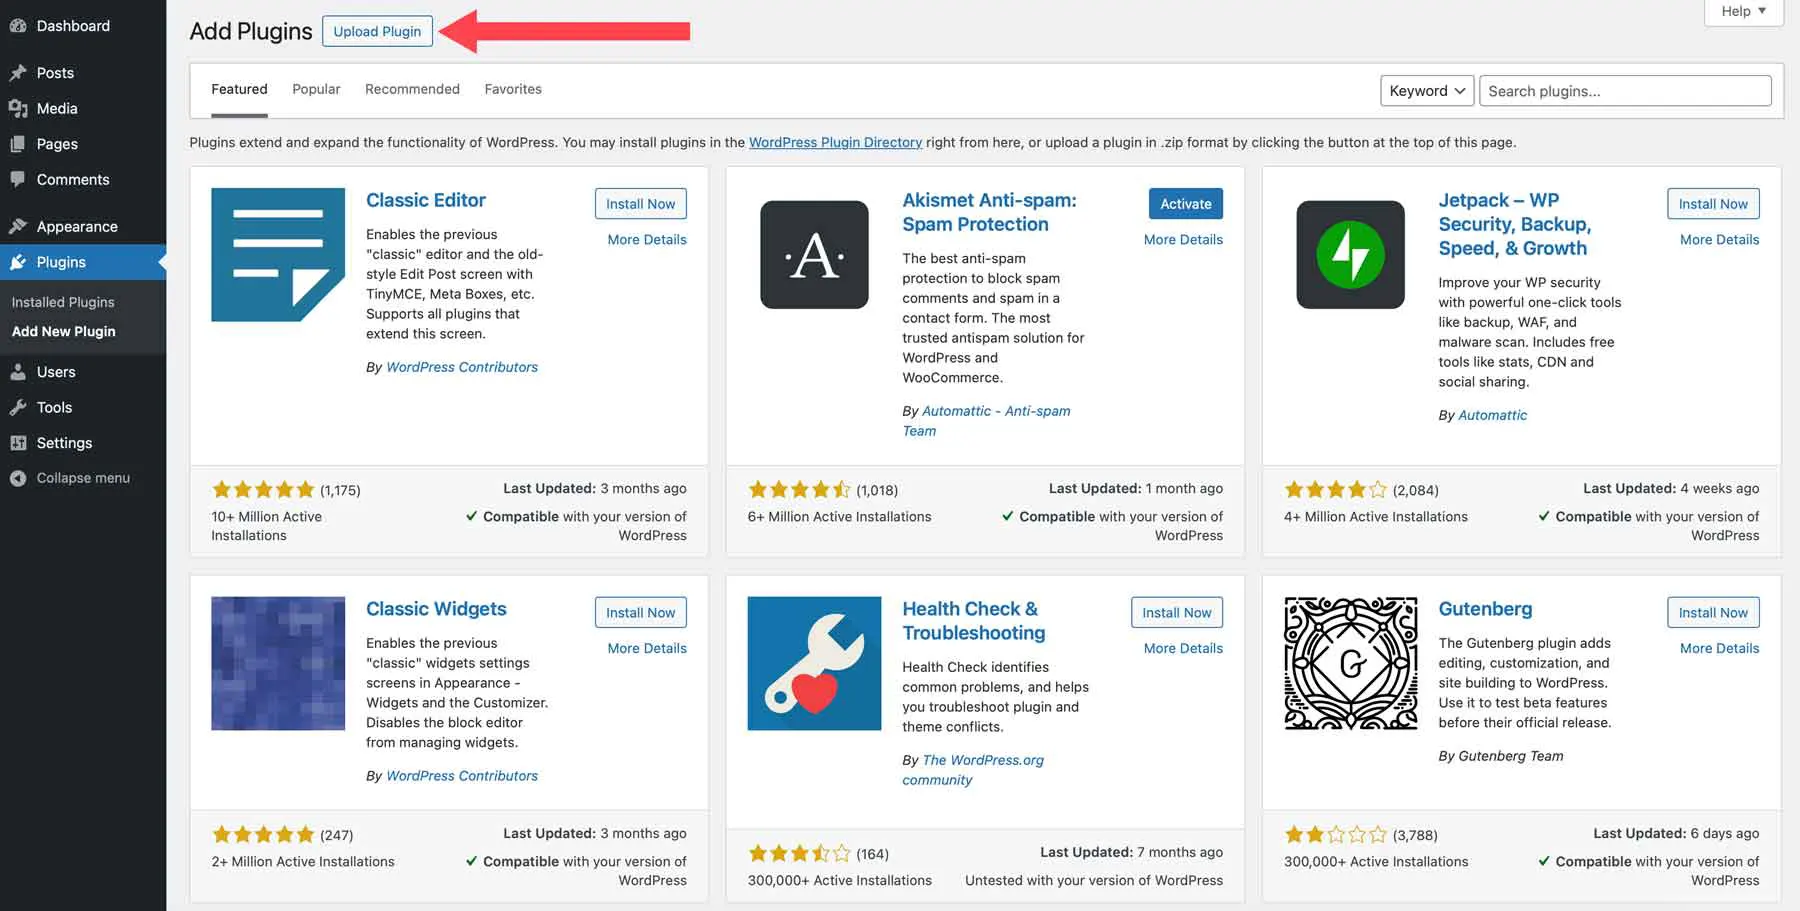
2. Installing a WordPress Plugin via Upload
If you navigate to Plugins > Add New, you’ll see both the search bar (used for finding plugins in the WordPress repository) and the Upload Plugin button. This option is useful when installing a plugin downloaded as a .zip file from an external site.
Important: Do not unzip the downloaded plugin file. WordPress requires the compressed .zip file for installation, so always upload it in its original format.
The most common source for downloadable plugins is the WordPress.org plugin repository. When you performed a search earlier, you were browsing this very directory. The process remains the same—find the plugin you need and download it as a .zip file for manual installation.
On the plugin page, you’ll notice a Download button instead of an Install button.
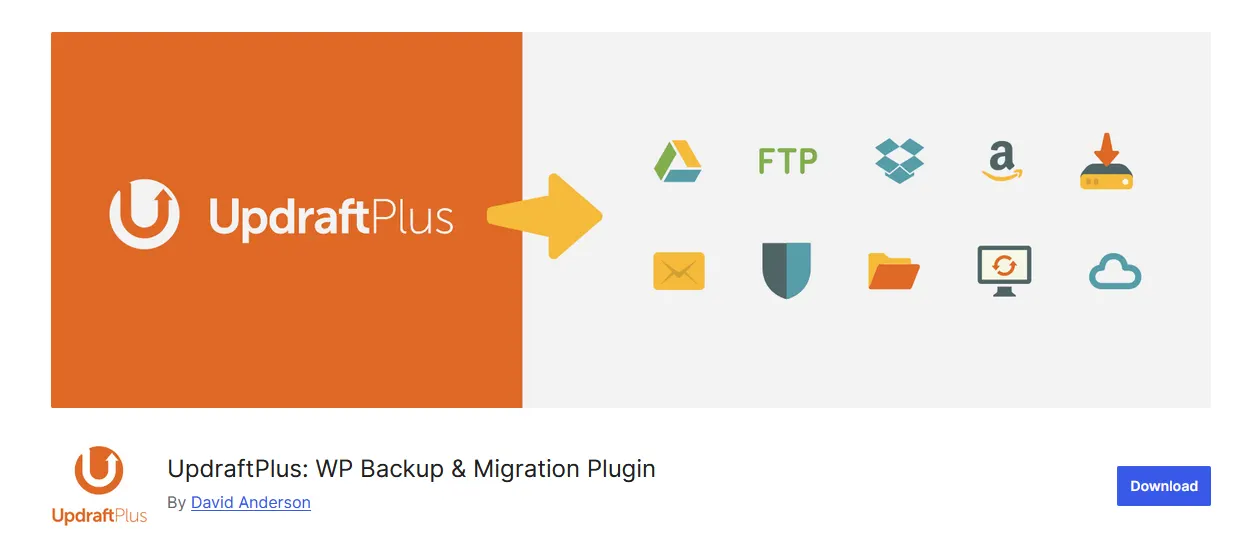
Using UpdraftPlus as an example, click the Download button to save the plugin files to your computer. If you’re using a Mac, the files may be automatically extracted upon download. In that case, right-click the folder and select Compress to re-zip it before uploading it to WordPress.

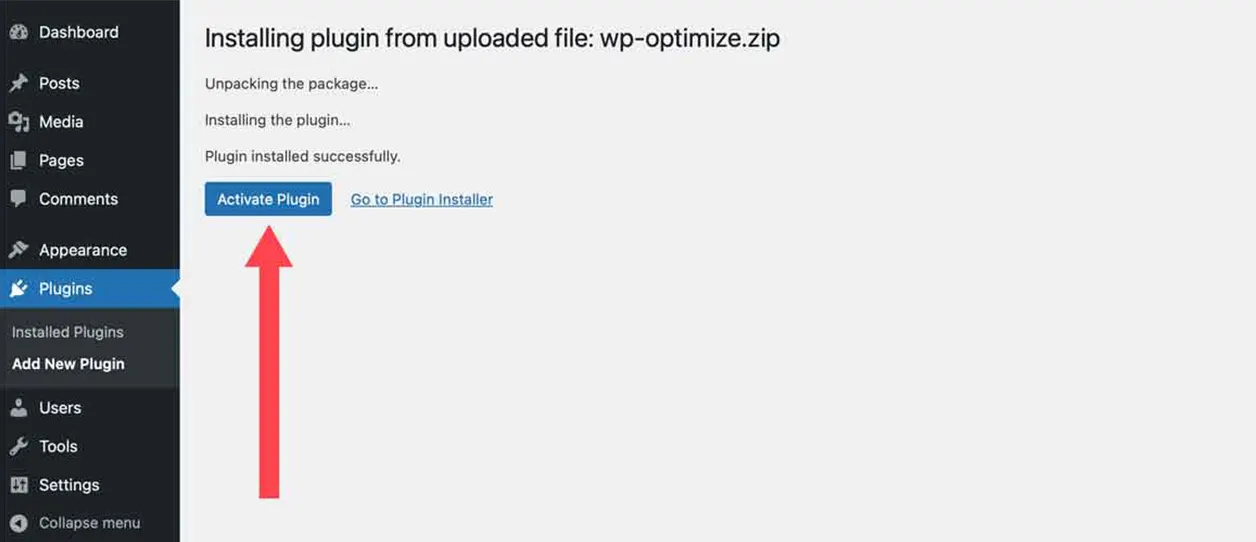
Go to Plugins > Add New Plugin and click the Upload Plugin button. This will reveal a Choose File option. Click it, locate the downloaded .zip file on your computer, and then select Install Now.
Make sure to click Install Now only once to avoid database errors while WordPress unzips the files and creates directories. Once the installation is complete, you’ll see an option to Activate the plugin. After activation, the plugin will appear in your list, just like those installed directly through the dashboard search.
Alternatives to the WordPress Repository
While the WordPress repository offers a vast selection of plugins, many third-party developers provide powerful plugins that can enhance your site’s functionality. With so many options available, it’s essential to research and choose top-performing plugins that align with your needs without adding unnecessary bloat to your website.
For curated recommendations, check out our Best WordPress Plugins category, where we feature expert lists of high-quality third-party plugins.
Here are a few popular plugin categories from third-party developers:
- Form Plugins – Easily create contact, opt-in, and survey forms with plugins like WPForms, Formidable Forms, and Gravity Forms.
- Security Plugins – Protect your site from malware and cyber threats using Solid Security and WP Activity Log.
- Image Optimization Plugins – Reduce image file sizes to improve website speed with EWWW Image Optimizer or ShortPixel.
- Speed Optimization Plugins – Enhance website performance with caching and speed tools like WP Rocket or NitroPack.
- Ecommerce Plugins – Transform WordPress into an online store using WooCommerce, Easy Digital Downloads, or Dokan Multivendor.
Exploring these options will help you find the best plugins for your site while maintaining optimal performance.
Explore Theme-Specific Third-Party Plugins

In addition to general-purpose third-party plugins, some developers create plugins tailored to specific WordPress themes. A great example is the Divi Marketplace, which offers plugins designed exclusively for the Divi theme.
Divi already includes powerful features like a Theme Builder for custom headers and footers, a no-code Visual Builder, and 200+ design modules. However, if you need additional functionality, the Divi Marketplace provides specialized plugins to enhance your site’s capabilities seamlessly.
One popular option is Divi Pixel, which expands your design capabilities with 50+ custom modules, 5 extensions, and 40 professionally designed layouts. With Divi Pixel, you can personalize every aspect of your website, from headers and footers to login pages and mobile menus. It also includes user-friendly enhancements like custom map markers, a scroll-to-top button, and smooth scrolling. If you want to take Divi to the next level, Divi Pixel is a powerful choice.

Lorem ipsum dolor sit amet, consectetur adipiscing elit. Ut elit tellus, luctus nec ullamcorper mattis, pulvinar dapibus leo.
3. Installing a WordPress Plugin Manually via FTP
Installing a plugin using FTP (File Transfer Protocol) is similar to the upload method, but instead of doing it within your WordPress dashboard, you’ll use an external connection to transfer the files directly.
To get started, you’ll need an FTP client—for this example, we’ll use FileZilla. Additionally, you’ll require SFTP access to your website. If you’re not the administrator, you can request these credentials from your site manager or obtain them through your hosting account.
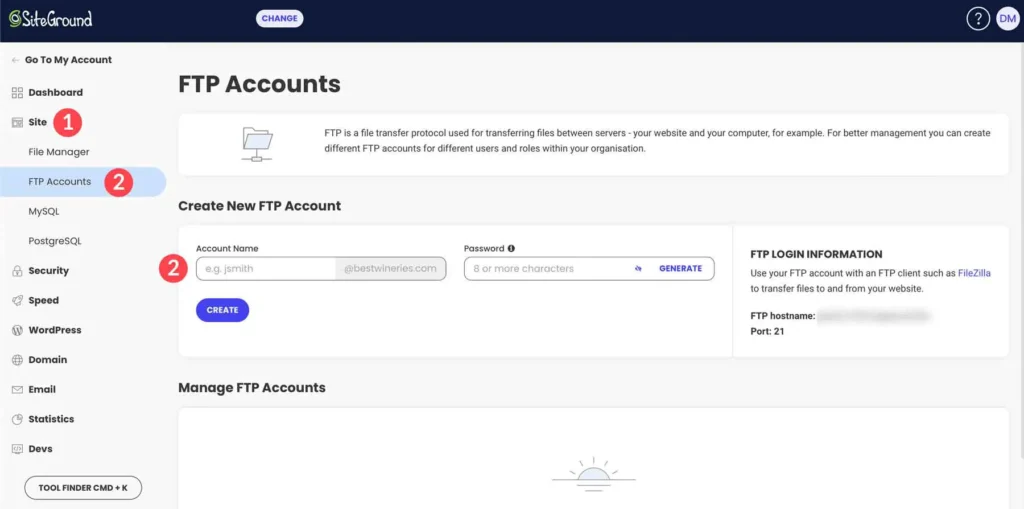
For example, if you’re using SiteGround, you can find this option under Site > FTP Accounts, where you can create an FTP account by setting up a username and password.
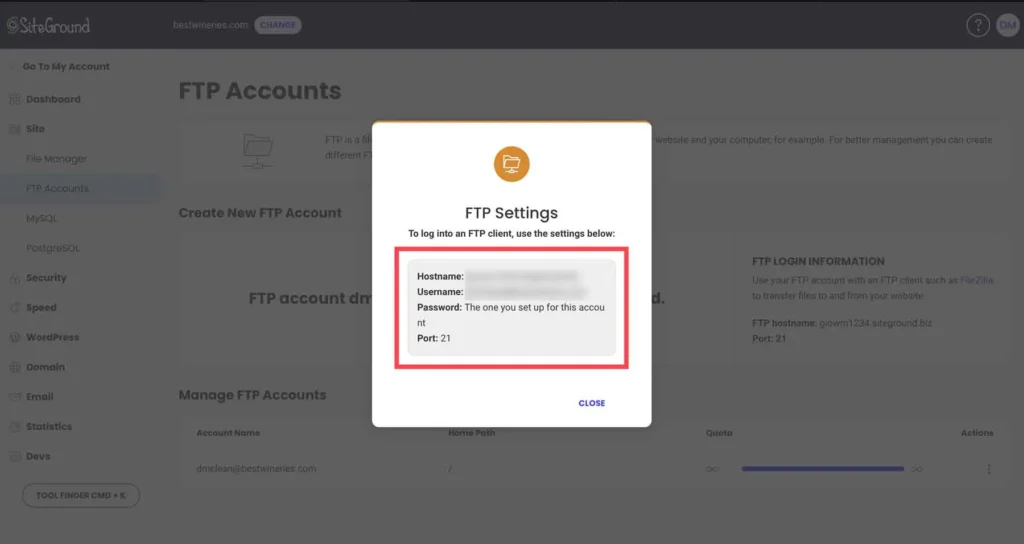
A popup will appear displaying the exact details you need to enter into your FTP client to establish a connection to your website.
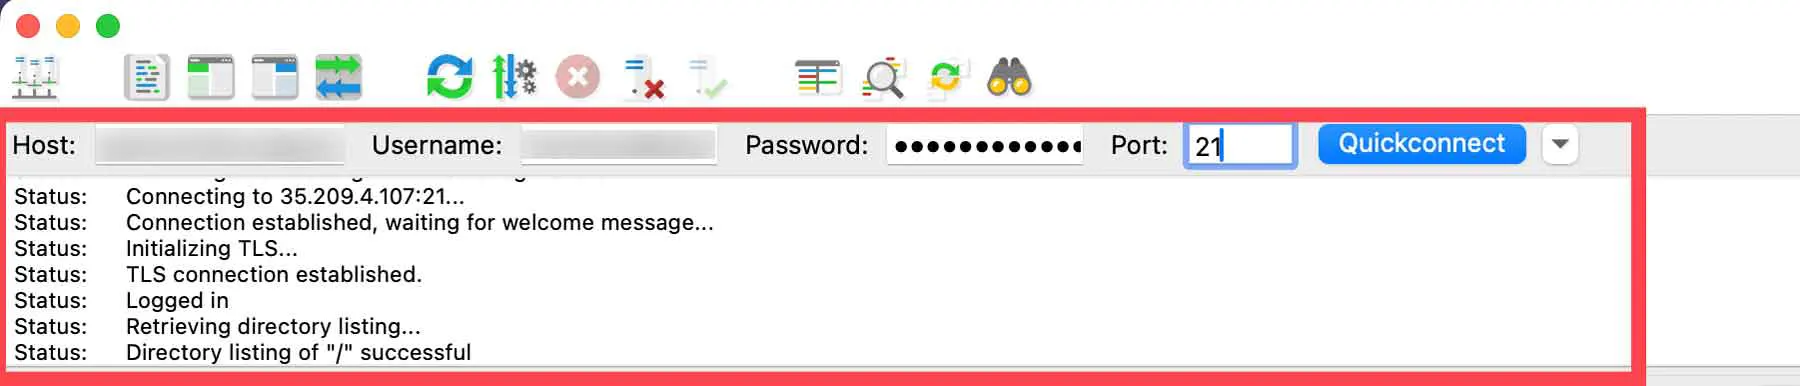
Input the provided details into your FTP client, and you’ll see status updates confirming a successful connection.
The key difference with this method is that you must manually extract the plugin’s contents before uploading. Unlike the previous upload method, you will transfer the unzipped files instead of the compressed archive—ensure you don’t rename any files.
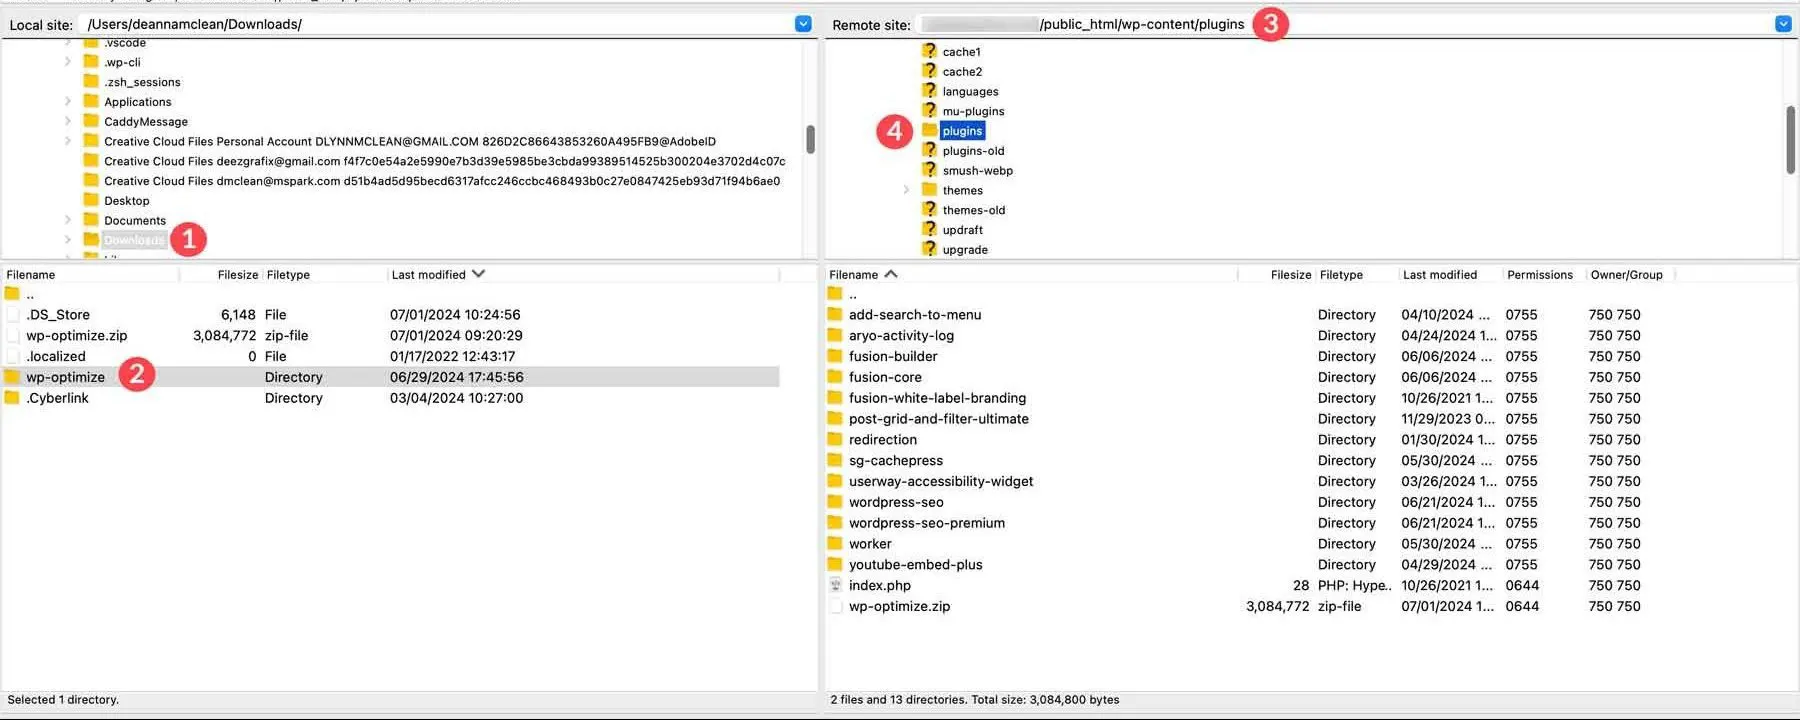
In your FTP client, you’ll see your local files on the left and your website’s files on the right. Locate the extracted plugin folder on your computer, then navigate to the /public_html/wp-content/plugins/ directory on your website.
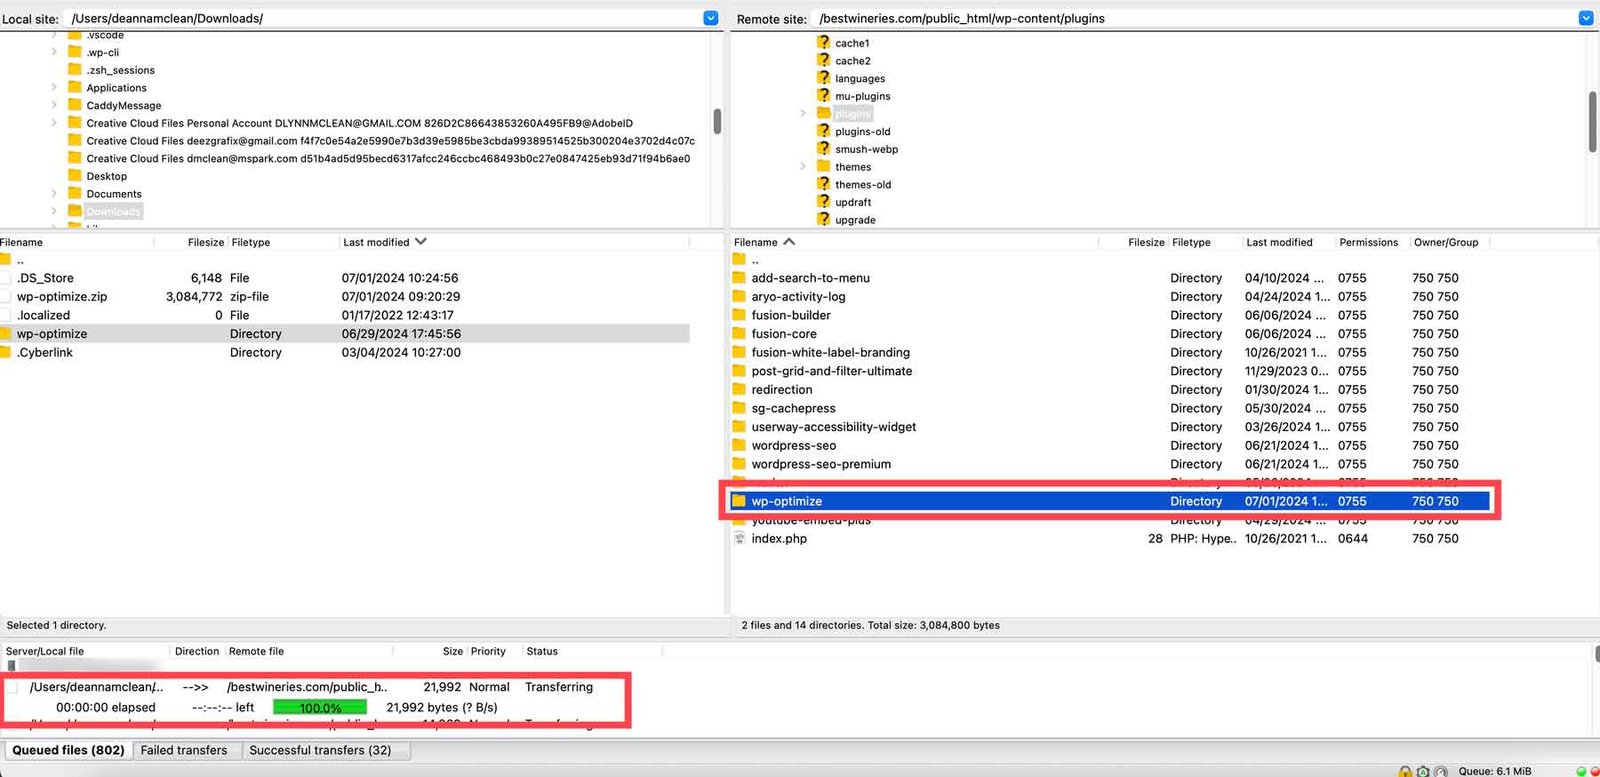
Next, right-click the plugin folder and select “Upload” once you’ve navigated to the /public_html/wp-content/plugins/ directory. This will transfer the plugin files to your site, and once the upload is complete, the plugin will appear in your WordPress plugins list.
Next, go to Plugins > Installed Plugins and click Activate to enable it.
That’s it! Disconnect your FTP client and start using your plugin right away.
Final Thoughts
WordPress is a powerful platform on its own, but plugins unlock its full potential. Whether you’re optimizing for SEO with Rank Math, boosting speed with WP-Optimize, or building forms with WP Forms, plugins make it all possible. By following the steps above, you can safely install plugins from any trusted source, whether it’s the official WordPress repository or a premium marketplace.
A Word of Caution
Avoid downloading plugins from unknown or suspicious sources, as they can contain malware or security vulnerabilities. Stick to reputable developers, like those found in the WordPress plugin repository, trusted third-party sites, or the Divi Marketplace if you’re a Divi user.
For more details on the plugins mentioned in this guide, check out the table below with links and pricing.
Frequently Asked Questions
We’ve covered a lot, but you might still have some questions. Check out the FAQs below for quick answers.
1. What should I consider before installing a WordPress plugin?
Ensure the plugin is compatible with your WordPress version and other plugins. Check ratings, reviews, and update history for security and stability. Only install plugins from trusted sources like weDevs or Elegant Themes, and make sure the plugin solves a specific problem or adds a useful feature.
2. Should I back up my site before installing a plugin?
Yes! Use a backup plugin like UpdraftPlus to restore your site if something goes wrong.
3. How do I install a plugin using the WordPress Plugin Search?
Go to Plugins > Add New Plugin in your WordPress dashboard. Search for the plugin, click Install Now, then Activate it.
4. How do I install a plugin using the Upload feature?
Download the plugin as a .zip file from a trusted source. In WordPress, go to Plugins > Add New Plugin, click Upload Plugin, choose the file, then click Install Now and Activate.
5. How do I install a plugin manually using FTP?
Download the .zip file and extract it. Connect to your WordPress host using an FTP client like FileZilla. Upload the extracted folder to /wp-content/plugins/. Then, go to Plugins in your WordPress dashboard and click Activate.